Monday, July 11, 2011
Sunday, July 10, 2011
Urban Wrap Around Bracelet

Here is a link to a tutorial and video that I wrote with the help of Bridgette Saunders.

Thursday, March 3, 2011
Wednesday, March 2, 2011
Updates on Tucson and Upcoming Events.
So I'm actually posting a blog! I miss this. I've been so busy lately that I have barely been able to get on the computer. The Bead Place is busier than ever, having just gotten back from the Tucson Gem and Bead Shows, and planning for three big events within the next two months.
We're holding a Tucson event next weekend for our Lifetime, Diamond and Platinum members. They'll get to watch demos, participate in make and takes, and get a chance at all the new stuff before anyone else.
Like these:


Hot Wired Glass Class Kits will be available. (My new class)
Our next event is the Intergem Gem & Jewelry Show that we're doing. I believe the dates are March 25-27th. We're going to have TONS of beautiful seed bead hanks and AWESOME kumihimo fiber kits. We'll be doing demos non-stop all weekend. It's going to be funnnnn. I love seeing all the vendors again. It's like a family reunion!
Toyo Feng, from Feng, Inc is coming Tuesday, April 5th to do a semi-precious stone TRUNK SHOW for our customers! It's gonna be awesome. I love Toyo.
All in all, we've just got a whole lot going on. TONS of new classes for all of us. No time to upload pics of all of them, but check out the shop's website to see the calendar.
AAAAANNNDDD, then a couple random pictures from Tucson:


Top: Hanna and I being goofy at the Tierra Cast booth Bottom: Our group with Marcia DeCoster
Well, thanks for reading! Back to the grind. ;)
Oh, P.S. Check this out! My face on today's beading daily! 3/1/11 Beading Daily Newsletter
We're holding a Tucson event next weekend for our Lifetime, Diamond and Platinum members. They'll get to watch demos, participate in make and takes, and get a chance at all the new stuff before anyone else.
Like these:

Xaz beads, and stuff from my awesome ladies, Joan and Lana at Off Center Productions!
Hot Wired Glass Class Kits will be available. (My new class)
Our next event is the Intergem Gem & Jewelry Show that we're doing. I believe the dates are March 25-27th. We're going to have TONS of beautiful seed bead hanks and AWESOME kumihimo fiber kits. We'll be doing demos non-stop all weekend. It's going to be funnnnn. I love seeing all the vendors again. It's like a family reunion!
Toyo Feng, from Feng, Inc is coming Tuesday, April 5th to do a semi-precious stone TRUNK SHOW for our customers! It's gonna be awesome. I love Toyo.
All in all, we've just got a whole lot going on. TONS of new classes for all of us. No time to upload pics of all of them, but check out the shop's website to see the calendar.
AAAAANNNDDD, then a couple random pictures from Tucson:


Top: Hanna and I being goofy at the Tierra Cast booth Bottom: Our group with Marcia DeCoster
Well, thanks for reading! Back to the grind. ;)
Oh, P.S. Check this out! My face on today's beading daily! 3/1/11 Beading Daily Newsletter
Monday, January 24, 2011
Bead Fest 2011
If you've been wandering my website or are on my e-mail list, you know this already, but I thought I'd make the announcement here:
I'll be teaching two classes this year at Bead Fest Philadelphia.
Here is the link to check out the two classes that I'm teaching:
Abbi's Classes at Bead Fest 11
If any of you are going to Tucson this year, I'll see you there! It's always fun to meet up, so let me know where you'll be so we can meet.
Sunday, January 16, 2011
Kits Now Available on the Website!

THREE of the most popular classes are now available as a kit on the website!
Each class kit comes with everything you need to create the bracelet, a hard copy of instructions, AND a private link to the video class for the project.
Life wouldn't be fun without variety, so in each kit, you have color combination choices to make each project your own!
Payment is made easy through PayPal!
Check out the Class Kits today!
Friday, January 14, 2011
Mind Body & Spirit Cruise
I just got back to St. Louis this morning from teaching on the Mind Body & Spirit Cruise to Cozumel and Key West on the Norwegian Sun. From what I understand, it will become an annual cruise, so check back if you're interested in booking for next year. The classes will be different, and we will probably have more options.
I taught Russian Spiral

Viking Knit

and also the Beaded Starfish

It was so fun to share experiences with these ladies at such an exciting time in our lives.
I saw some of the Mayan Ruins. It was awesome. We did some shopping and I got some great deals on some silver bracelets. Sorry about the low quality in these next photos. I'm tired from the drive and I don't feel like finding my camera so I'm using the webcam.
 I got my Mayan astrological sign "Ceh" carved in fish bone by Mayan artisans in Mexico.
 I collect ammonites, so this was an awesome find.
 I got the outer two at the ruins and the middle one in Cozumel. Pandora-style beads fit on the right one, so that's fun.
 Mike bought me this cute zebra Pandora-style bead so I think I'm gonna put together a vacation series of Pandora-style beads from this trip. I have a cute little lampwork dice bead and also a crab which is cool because we saw some awesome sea life in the tide pools at Cozumel. I saw tons of baby hermit crabs, fish, and snails, as well as a black sea urchin and some other weird creatures. I also found tons of sea glass on the beach which will be fun to play with.
 Paper Mache Dia de los Muertos Catrina made by Mexican artisans.
 Cute little hand painted Dia de los Muertos ornament. You can't see the detail, but it's really well-painted.
 Some of the awesome things I found at the beach. I found a lot of beach glass in all different colors (including purple!), but the middle left piece is the most interesting because it had barnacles on it.
 My friend, Sarah, and I got matching henna tattoos in Key West as well!
It was so fun. I might post more pictures from the trip when I upload them. I'll be working on my website soon, so look forward to new products and pages.
I taught Russian Spiral

Viking Knit

and also the Beaded Starfish

It was so fun to share experiences with these ladies at such an exciting time in our lives.
I saw some of the Mayan Ruins. It was awesome. We did some shopping and I got some great deals on some silver bracelets. Sorry about the low quality in these next photos. I'm tired from the drive and I don't feel like finding my camera so I'm using the webcam.


It was so fun. I might post more pictures from the trip when I upload them. I'll be working on my website soon, so look forward to new products and pages.
Sunday, December 12, 2010
Sneak Peak at the book I'm working on.
Here's a sneak peak at the first chapter of the book I'm working on. No pictures in the preview, but at least some hard facts, haha.
Findings
Findings are basically everything in your jewelry that’s not a bead. They’re not necessarily the pretty parts, but they’re the necessary parts to jewelry making. They are the small “parts” used to assemble your pieces together.
We’ll start out with metals. It is very important to know what metal your findings are made of, not only for your own knowledge, but more importantly if you are planning to give your jewelry as gifts, or if you’re planning to sell your wares. People will ask, since approximately 30% of the population is allergic to nickel, which is found in a lot of jewelry making components.
Base metal findings can be made mostly of nickel or a brass mixture which can contain nickel. They’re usually plated with a silver or gold coating that can also contain nickel.
Surgical or Stainless Steel findings are dark grey in color and they can also contain small amounts of nickel.
Sterling Silver is 92.5% solid silver with an approximate 5% (+/-) nickel content. Although sterling does contain a small amount of nickel, it’s usually not enough to cause a reaction to someone who has a nickel allergy. In some cases, you will come across someone who cannot wear regular sterling, in which case you could search for NF Sterling, which stands for nickel free. There are also other silver colored alternatives that you could use such as fine silver (99.9% silver), Bali silver (sometimes a higher silver content than sterling), Thai silver (92.5-99% silver), or white gold findings.
Gold-Filled findings are made by heat and pressure bonding a layer of gold to a brass cone. It basically becomes a new compound when it is bonded and will not rub off like a plated metal might.
Copper and Brass findings have recently become readily available and very popular. They are relatively inexpensive and easy to work with because of their malleability. Some people have certain acids or chemicals in their bodies which react with these metals to create a dark marking on their skin.
Earring Findings
An earring finding is the “part” that goes into your ear. They can be decorative, so I won’t say that they’re not a pretty part. They are what you attach your beads to. Below are the most popular styles of earring findings.
FRENCH WIRES – the most popular of all of the earring findings, very easy to put in, relatively inexpensive, dangly, discreet, rubber stoppers can be used to prevent the wires from slipping out
LEVERBACKS –the second most popular, very secure because of the clasping back, easy to put in,
BALL STUDS/POSTS –usually for lightweight or short earrings because they can tilt or fall out otherwise, the back part that pushes on is called an “ear nut”, sits up higher in your ear so the dangle hangs shorter
KIDNEY WIRES –usually seen on older jewelry because they’re hard to put in, some really like them because if it’s not easy going in, it’s not going to fall out very easily, made a fashion comeback recently in an oversized form used with a very short dangle or simple bead, relatively inexpensive
EAR THREADERS –usually box or small link chain at the end of a post that is threaded through your ear to desired length, a rubber stopper can be used to secure longer lengths, beads can sometimes be strung directly onto the ear threaders, or just a simple bead or short dangle to be dramatic, can be looped through multiple holes if ears are double pierced
HOOPS –can come pre-made but are very easy to create out of wire, beads are threaded directly onto the hoop, the wire is then bent with chain nose pliers to secure into the loop on the other side
CLIP-ONS –clips on the ear, can be adjusted to relieve the headache or so that you don’t lose them, women who have worn heavy earrings and have holes that sag may prefer these for heavier earrings because they are more comfortable, usually more expensive than other types of earring findings because there is more metal used in making them and a little bit more engineering as well
INTERCHANGEABLES- a subcategory of certain earring findings that allow you to interchange your dangles as you see fit, make great gifts because you can send a couple pairs of earrings with just the investment of one pair of interchangeable, most of them are made so that the dangles are not able to come out when the earrings are put in the ear, usually found as french wires, leverbacks, or kidney wires
Clasps
A clasp is what attaches one side of your jewelry to the other so that it stays on you. There are many other types of clasps besides these, but these are the most popular and accessible clasps for beginners.
SPRING RING –usually found on children’s jewelry or inexpensive jewelry, tend to not last long/not made well for heavier jewelry, there is an actual spring on the inside that can hop off track, thin metal that can bend out of place, attaches to chain, a tab closure, or a soldered jump ring (Any time you use a jump ring as a part of a clasp in basic stringing, you need to make sure that it is a soldered ring.)
LOBSTER CLASP –most popular style of clasp, better engineered version of a spring ring, the spring mechanism inside is an arm that rocks back instead of a spring on a track, good in almost any application, also attaches into chain, a tab closure, or a soldered jump ring, great for making your jewelry adjustable if you finish off with chain, you can clasp the lobster into any link to wear your necklaces at different collar lengths or to fit others appropriately if you are selling your jewelry or giving it as gifts
BARREL CLASP – I don’t really recommend using these clasps ever. One end of the barrel screws into the other and can unscrew very easily, very hard to put on, not easy to work with, swivel around and can get caught in your hair
FISH HOOK – usually found on pearl strands or lightweight necklaces because they are mostly made of thin metal, very secure for lighter projects, most of them are made using a filigree design which basically means it has cut outs to look fancy, has an extra safety hook to prevent losing your jewelry if it happens to open
BOX CLASP – most often found as a multi-strand clasp because they are so wide (The advantages to using a multi-strand clasp instead of crimping multiple strands down to a single strand clasp are as follows: Any time there is break in a design, that is where your eyes are going to go to first, so if you’ve worked hours on a beautiful 5 strand bracelet and you crimp down to a dinky lobster, it’s going to look like it doesn’t fit. Your projects will also lay on your neck or wrist a lot better if the strands aren’t overlapping one another at the ends, and chances are they will wear better as well. You should always find a clasp that fits well with your design.) , pinch and pull them to unclasp, sometimes are set with stones or are decorated with other things to make them look nice since they make such a statement in your jewelry
MAGNETIC CLASP –good for lightweight projects only, can come in many styles (and strengths!), be sure the wearer doesn’t have an insulin pump or a pace maker, don’t wear next to a watch or while working on electronics for long periods of time, doctors advise pregnant women to stay away from magnetic jewelry, a safety chain (small piece of chain that attaches from one side of the clasp to the other that bridges the gap, yet still allows your hand to fit through) can be added to prevent the wearer from losing jewelry if the magnets come apart
TOGGLE –my personal favorite, the easiest to get on when used on a bracelet (with the exception of a magnet clasp), very secure when a bracelet is sized appropriately to the wearer, good in almost any application, come in many different styles and designs
S-HOOK –strands are finished off on both sides to soldered jump rings that slide into the arms of the s-hook, very secure for necklaces, great for changing necklaces from single-strand to multiple-strands by interchanging the strands, very easy to attach, can easily be made out of wire with a bench block and a chasing hammer
HOOK AND EYE –very secure for necklaces, hook side attaches into a specific eye, a soldered jump ring, or chain to make the project adjustable, hooks can also easily be made out of wire with a bench block and a chasing hammer
BAR CLASP –designed for wide, tight fitting projects because the clasp attaches by sliding in from the sides, spring mechanism on the inside prevents clasp from opening by itself, sometimes available with magnets inside to attract the sides to one another (not necessary for staying secure, just makes it easier to find the hole to put it in), usually always available as a multi-strand clasp
Others
HEADPINS –shaped like an upside down nail, beads are strung onto it to make earring dangles, charms, or pendants
OPEN JUMP RINGS –round or oval rings used to connect parts together that cannot be linked directly together themselves
CRIMP BEADS –small beads that you smash with a crimping tool in order to secure your jeweler’s wire to your clasp (Chances are you’ll only need to worry about size 2x2 crimp tubes, which are the standard crimps anyway. Crimps are what hold everything together, so even if you’re using lesser expensive findings in other places, this is no place to cheap out. You want to make sure you’re using good malleable metals such as sterling silver, gold filled, or copper, because base metal or silver plated crimps will crumble as you crimp, or could crack with time.), will turn into a flat hot dog bun shaped bead or a round ball depending on your crimping tool
LARGE HOLE BEADS –small beads with extra large holes (compared to other beads that size) so that you can tuck the jeweler’s wire back into them at the end of your necklace, scales down the necklace to the crimp for a nicer finish than tucking the wire into your last bead, usually 3 or 4mm round balls, but often other beads are used
WIRE PROTECTORS/GUARDS or BULLION WIRE–optional horseshoe shaped tube that protects the jeweler’s wire from an abrasive clasp, covers the wire that shows at the end of the project between the crimp and the clasp
CRIMP BEAD COVERS –metal shells that are closed over a crimp bead that has been crimped using the standard crimper, covers crimp abnormalities, looks like a seamed bead when closed correctly, can also be used to fill in spaces of empty jeweler’s wire left by allowing too much slack before crimping
JEWELER’S WIRE –flexible nylon coated steel wire used to string necklaces and bracelets. I strongly recommend Soft Flex brand jeweler’s wire in the medium gauge. Soft Flex is pretty much the only one that does the job right, in my opinion. It is 49 strands of stainless steel, micro-braided and nylon coated, with a 26 lb. weight test. You may be thinking, “Why would I ever want to wear a 26 lb. necklace?” Well, it’s not the weight of the necklace; it’s what could be pulling on the necklace. You’ll want to use medium for just about everything, unless you can’t fit it through a hole. In that case, it’s acceptable to use the fine gauge, but you’ll have to use a special crimp or special crimper. You could also use heavy for super abrasive or heavy beads or for something you’ll be wearing every day that will take a lot of wear and tear. Not all jewelry is indestructible, but Soft Flex is one of the most durable materials to use.
Tuesday, October 5, 2010
Sunday, August 8, 2010
Free Demo Sunday! Tubular Peyote Bangle!
Tubular Peyote Bangle!

Materials Needed:
25g size 6 seed beads
8lb Fireline
Big Eye Needle
Tape Measure
Tape Measure

Measure your folded hand at its widest point.

Thread a length of Fireline that you are comfortable working with onto your needle. String the seed beads until they measure 1/2 longer than your hand measurement. Make sure that there are an even number of seed beads. When it comes to sizing bangles, if you are in doubt, add more seed beads.

Tie the seed beads into a circle using a double square knot. (Right over left, left over right, twice.)

Take the needle through one bead in the direction that you are planning on working.

Add one bead to the needle. Skipping one bead in the circle, take the needle through the next bead.

Add another bead, skip one bead on the circle, and go into the next bead.

The beads you are adding should line up against every other bead in the original circle.

It doesn't really matter to which side the beads are falling when you are completing your first two rows.

Complete the entire circle in this way.

When you have completed the last row, take the needle up to the next row by stepping up and going through the next bead in the row you have just added.

Continue to add a bead into every other spot. It will get easier to see where you are adding the beads. They will seem to go into the missing spots.

Step up to the next row in the same way. Continue around and finish this row just like before.

Continue to add until you have 8 rows. Peyote rows are counted in a zig-zag. If you have 8 rows, there should be four beads stacked upright next to another stack of four beads that are offset from the first one. Start to zip up the sides by going through a bead on the edge of one side, then through the next bead on the other side.

Pull tightly as you go through each bead. You will notice how the ends go together like a zipper and each bead falls into place.

If your peyote stitches are very tight throughout the bracelet, you might need to guide the beads into the right spot to zip up the rest once you get to the end. You might want to loosen the zipped area about an inch below what you are trying to close. Guide the beads into the direction they need to go in order for you to close the entire bracelet.

Continue around the entire circle pulling very tightly as you go to ensure that the side you are zipping looks just like the regular peyote stitch you've used to assemble the bracelet so far.

You will need to reinforce the part that you have just zipped shut. It may be helpful for you to curve the end of your big eye needle so that you can use it like a hook to enter and exit the beads that you are reinforcing.

Once you have reinforced the side that you have zipped shut, the peyote stitches should look fairly uniform. Knot the thread into the bracelet making sure that you are knotting around at least two threads in the stitch. When in doubt, add another knot. :) Trim the extra Fireline.

If your measurements were correct, you should have a Tubular Peyote bangle that slides over your hand and fits comfortably on your wrist!
Thanks for reading!
Join www.abbiberta.webs.com for more great demos and how to's.
Stop back every Sunday for the next FDS!
If you enjoyed these instructions, follow me!

Sadie says "Thanks for subscribing!"
Sunday, August 1, 2010
Free Demo Sunday! How to do a Briolette Bail!


Here is a video on how to do a couple different versions of a briolette bail.
Sunday, July 18, 2010
Free Demo Sunday! Soda Bottle Cuffs!


Materials List:
Plastic 20oz bottle with a smooth middle section
Sharpie or permanent markers
Sharp Scissors
Ribbon, yarn, or white gauze
White or clear tape
Misc. embellishing objects such as beads to sew on or grommets, studs, eyelets, etc.
ink pads
Microwave (...I know, right?)


Sharpie or permanent markers
Sharp Scissors
Ribbon, yarn, or white gauze
White or clear tape
Misc. embellishing objects such as beads to sew on or grommets, studs, eyelets, etc.
ink pads
Microwave (...I know, right?)

Cut the top and bottom off of the soda bottle leaving just the smooth middle section. An easy way to get started is the pinch one spot together like you're folding paper in half and start the cut. Insert one blade of the scissors through the hole and cut along the line in the plastic.

Peel off as much of the label as you can. If you are planning on covering your cuff with ribbon, yarn, or any other material, this part doesn't matter too much. If you are planning on doing the mock stained glass design, it is pretty important to get almost all of the label off.

Cut the tube into the widths of your desired cuffs. Depending on the style of the bottle, you should be able to get at least two cuffs out of the tube. I cut three, but would have been able to cut four if I would have made them smaller.
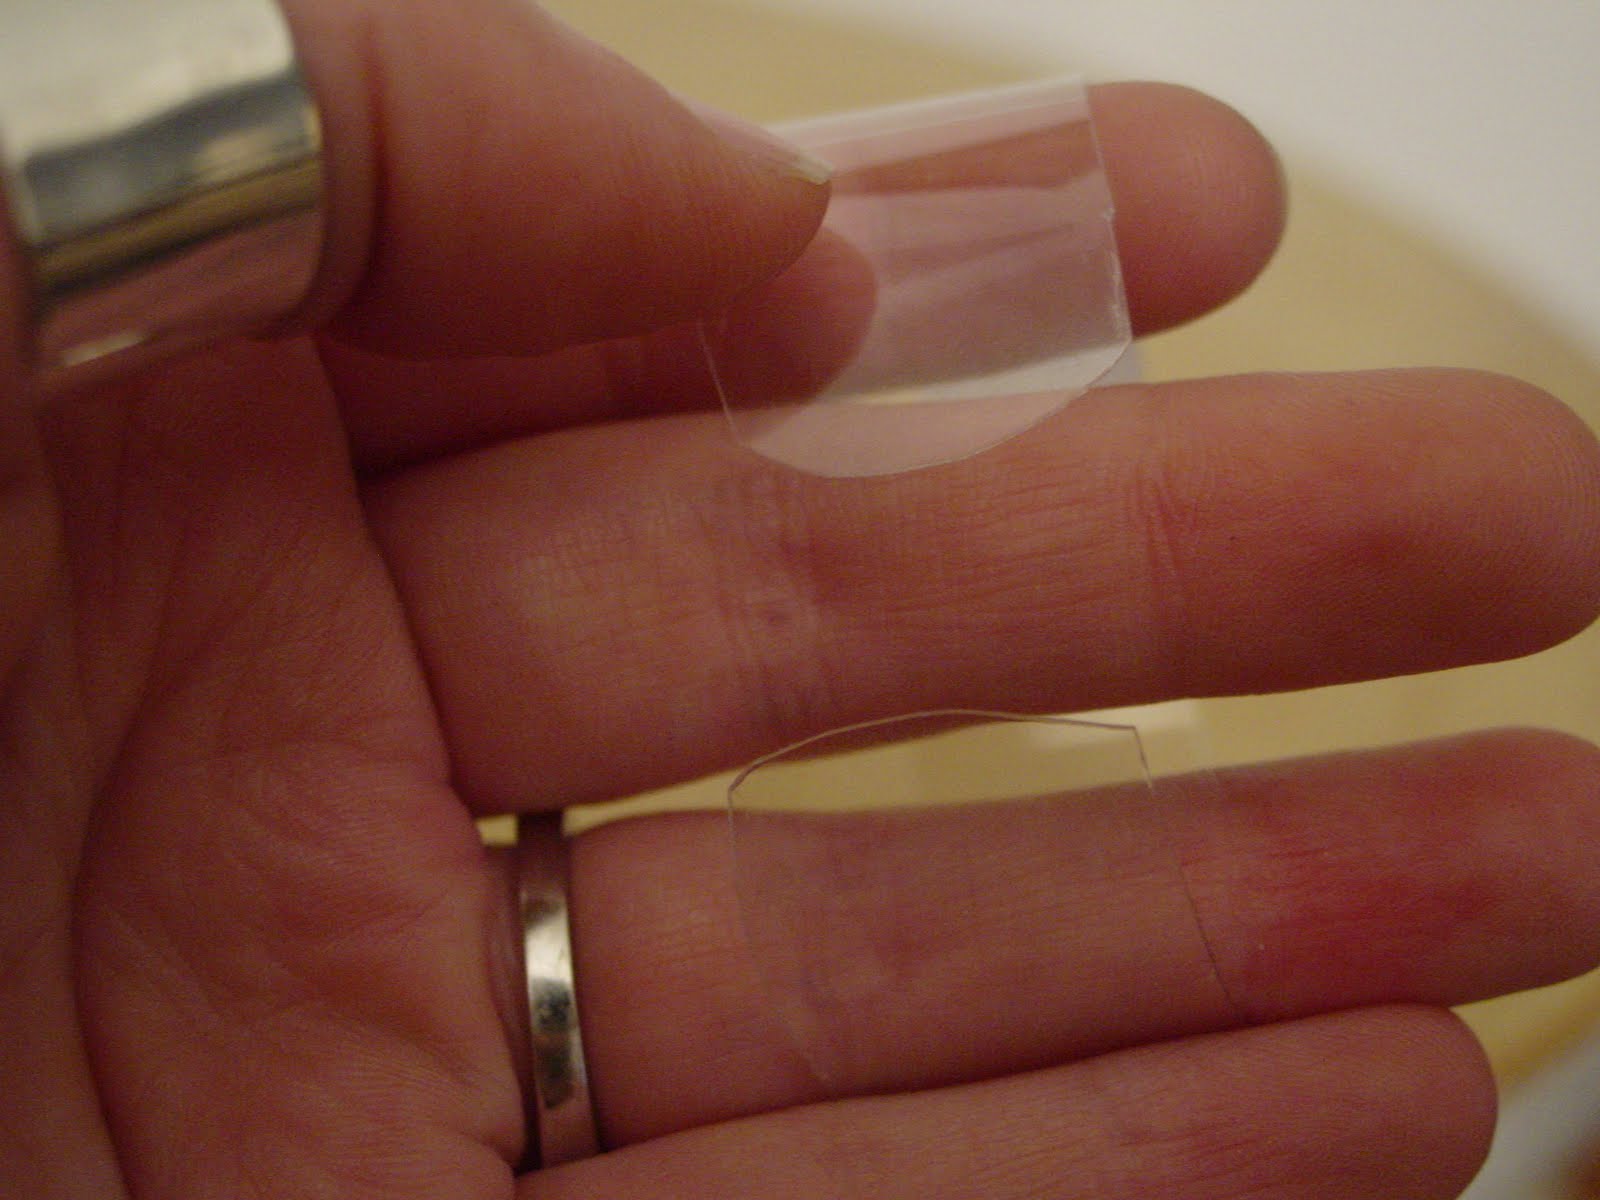
Cut through the cuff to open it and round the edges like shown. If you have a smaller wrist, you may want to cut a small section out of the cuff to make sure the sides don't overlap on your wrist. If you are wrapping something around the cuff, make sure you leave it a little longer because the material around the cuff will make it fit a little tighter on your wrist.

If you are wrapping ribbon or yarn around the cuff, start with a little bit of tape and tightly spiral your material around the cuff. Don't wrap too tight otherwise your cuff will become warped and may not stay curved around your wrist. Don't wrap all the way to the ends because the loops would slip off of the rounded edge

Knot the tail end of the ribbon securely to the underside of the cuff and then cut the tail end off.
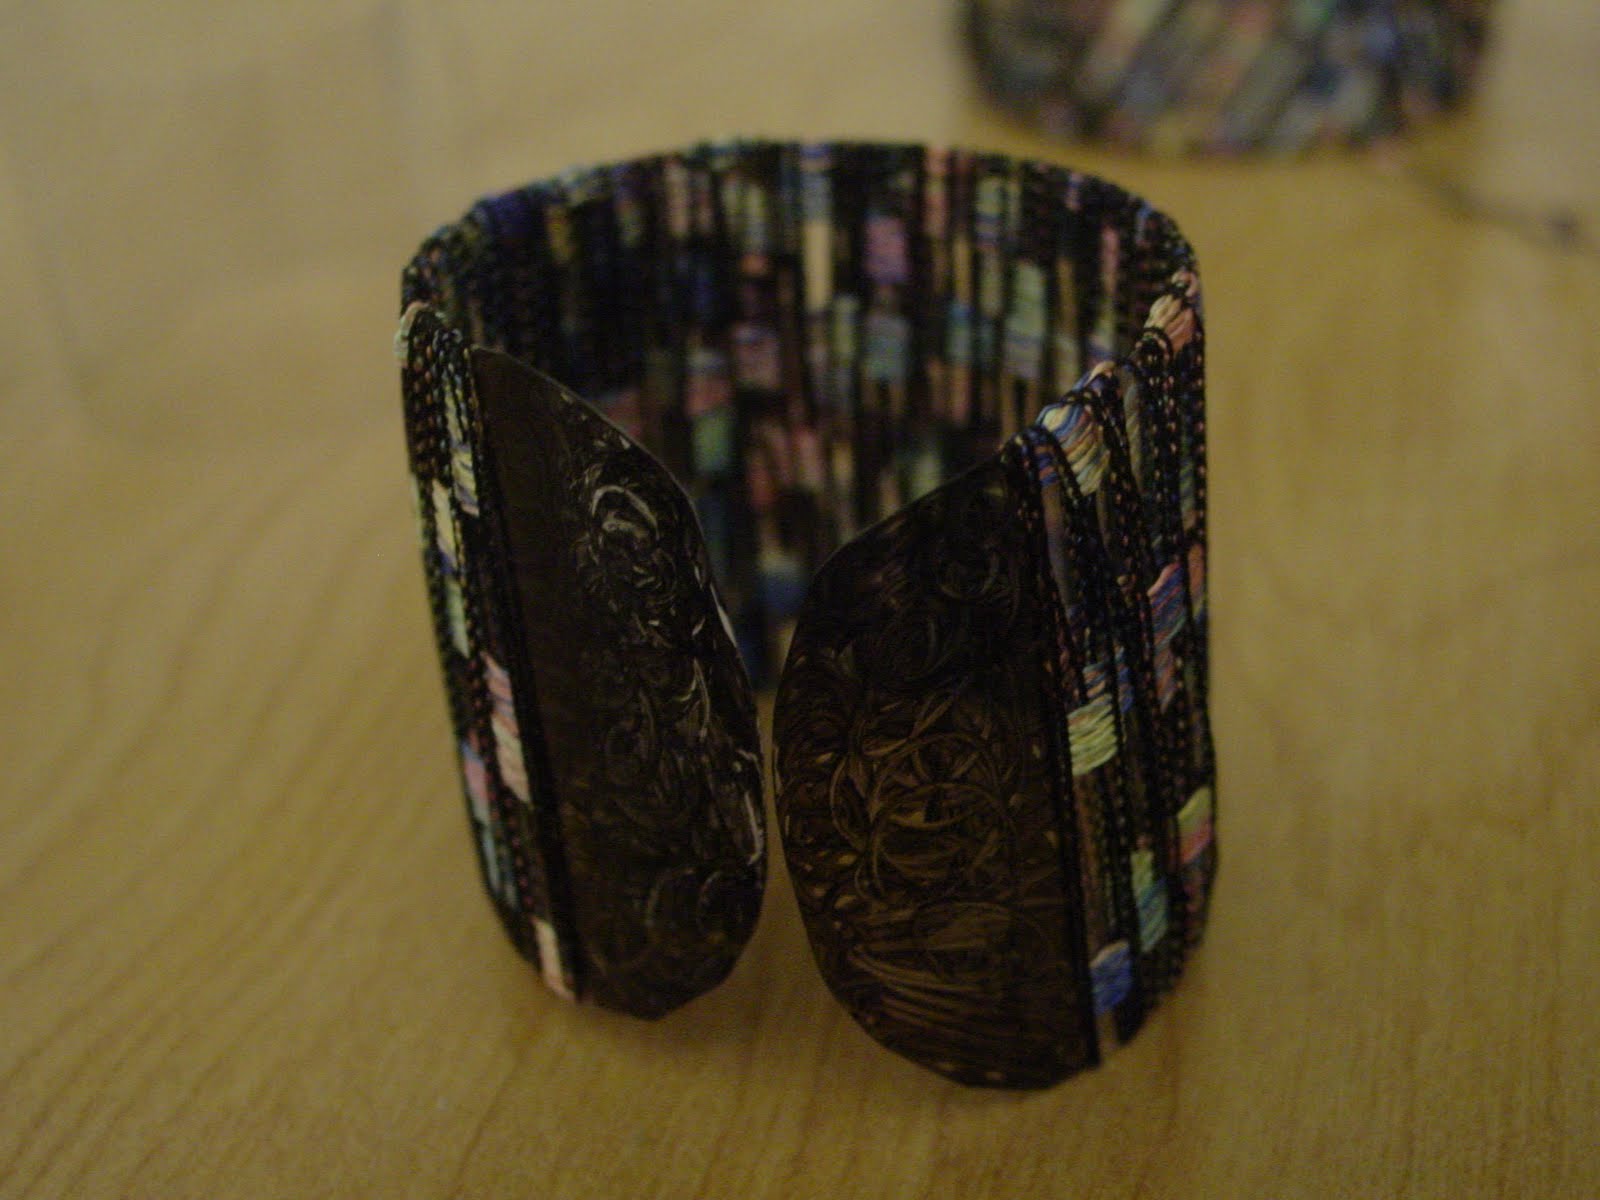
You could leave the ends clear, or color them with a permanent marker that matches your color scheme. If you color them, pop the whole cuff in the microwave for about 2 minutes (depending on your microwave strength) to set the color into the plastic so it won't wear or scratch off.

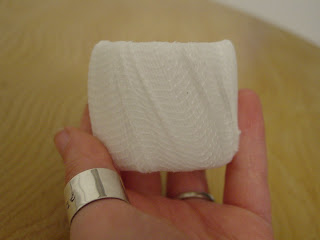
If you have another cuff to work with, or if the first option isn't your style, try this easy and fun cuff. Tape one end of a roll of white gauze to the underside of your cuff. Wrap longways around the cuff first to make sure the sides get covered, then wrap from top to bottom until the cuff has been covered in several layers.


Thanks for checking out my Free Sunday Demo! Subscribe and leave a comment telling (or showing) me what you did with your soda bottle cuff!
Check back every Sunday for more awesome tutorials!
P.S.
While making these cuffs, little Sara became very interested in bracelets. She especially liked the ribbon yarn used in the first cuff. She wanted to make a bracelet, too. :) We decided to make a Dora the Explorer style bracelet with a big flower in the middle. Here is a picture of Sara with her bracelet.


She also kind of confiscated the stained glass bracelet from me as well... Get 'em while they're young. :)
www.abbiberta.webs.com
Subscribe to:
Posts (Atom)